You’re playing Axis & Allies Global 1940 and need to look up the rules on your phone. That PDF is nasty to dig through on a phone, right? Below find a copy/paste of *most* of the rules necessary to play Global 1940 with Second Edition rules. Some of the more basic items have been left out. It’s more useful for those who have played the game many times but still need to look up a rule here and there. For the full rules consult our Axis & Allies Rule Books page.
These rules were updated in February 2024 to align with the most recent official rule books. This page is in beta. One item that is not available yet is the unit profiles (what each unit can do and what rolls are required to do so.) The Table of Contents will be fully fleshed out in due time. Have feedback? There’s a comment box at the bottom of the page.
Table of contents
- Spaces on the game board
- Territories
- Sea Zones
- Islands
- Canals and Narrow Straits
- How the war is won
- Number of players
- Setup
- Order of Play
- Phase 1: Purchase & Repair Units
- Phase 2: Combat Move – (Powers at War Only)
- Sea Units Starting in Enemy-Occupied Sea Zones
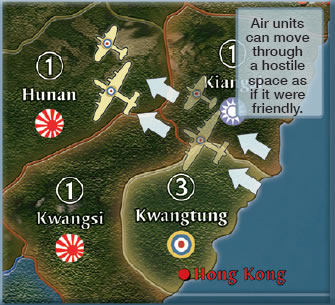
- Air Units
- Amphibious Assaults
- Special Combat Movement
- Phase 3: Conduct Combat (Powers at War Only)
- Kamikaze Strikes
- Strategic and Tactical Bombing Raids
- Amphibious Assaults
- Air Units
- General Combat
- General Combat Sequence
- Step 1. Place Units Along the Battle Strip
- Step 2. Submarine Surprise Strike or Submerge (Sea Battles Only)
- Step 3. Attacking Units Fire
- Step 4. Defending Units Fire
- Step 5. Remove Defender’s Casualties
- Step 6. Press Attack or Retreat
- Step 7. Conclude Combat
- Liberating a Territory
- Capturing and Liberating Capitals
- Capturing a Victory City
- Phase 4: Noncombat Move
- Where Units Can Move
- Phase 5: Mobilize New Units
- Restrictions on Placement
- Phase 6: Collect Income
- Conduct Convoy Disruptions
- Global United Kingdom rules
- Research and Development
- Purchase and Repair
- Combat Moves
- Mobilize New Units
- Collect Income
- Capture of One of the United Kingdom’s Regional Capitals
- Capture of an Axis Capital
- Movement between Maps
- Political situation
- Germany
- Soviet Union
- Japan
- United States
- China
- United Kingdom
- Italy
- ANZAC
- France
- Dutch Territories
- Neutral Territories
- China Rules
- Additional rules
- Optional rule: Research and development
- Research and Development Sequence
- Breakthrough Chart 1
- Breakthrough Chart 2
Spaces on the game board
Territories
The border colors of the territories on the game board show which power controls them at the start of the game. Each power has its own color and emblem (the United Kingdom controls the Canadian territories in addition to those with its own emblem). When the rules refer to the “original controller” of a territory, they mean the power whose emblem is printed on the territory. (A few territories in China have a Chinese emblem on them but are controlled by Japan at the start of the game. These territories are considered to belong to China originally, but have been captured by Japan.) All other spaces are neutral and are not aligned with any power.
Most territories have an income value ranging from 1 to 10. This is the number of IPCs the territory produces each turn for its controller. A few territories, such as Wake Island, have no income value.
Units can move between adjacent spaces (those that share a common border). Spaces that meet only at a point (such as Western United States and sea zone 1) are not adjacent to one another, as they do not share a common border.
All territories exist in one of three conditions:
Friendly: Controlled by you or a friendly power.
Hostile: Controlled by an enemy power (a power with which you are at war).
Neutral: Not controlled by any power, or controlled by a power on the other side with which you are not yet at war (see “The Political Situation,” below). Neutral territories, such as Central Mongolia, have white borders and do not have any power’s emblem on them. Most such territories also have a unit silhouette with a number, which indicates how many infantry units the territory will generate to defend itself when its neutrality is violated. The Himalayas, The Sahara Desert and Pripet Marshes are impassable and may not be moved into or through by any units.
Sea Zones
Sea zones are either friendly or hostile. Friendly sea zones contain no surface warships (this doesn’t include submarines and transports) belonging to a power with which you are at war. Hostile sea zones contain surface warships belonging to a power with which you are at war. (The presence of a surface
warship belonging to a power on the other side with which you are not yet at war doesn’t make a sea zone hostile).
Note: The Caspian Sea (surrounded by Caucasus, Kazakhstan, Turkmenistan, Eastern Persia, Persia, and Northwest Persia) is considered to be a sea zone, even though it does not have a number.
Islands
An island or island group is a single territory surrounded entirely by one or more sea zones. A sea zone can contain at most one island or island group, which is considered one territory. It’s not possible to split up land-based units so that they are on different islands in the same group.
For example, Sardinia and Sicily are both located in sea zone 95. These named islands can each have independent land-based units. However, West Indies, located in sea zone 89, is an island group (one territory), so any land units there are all together, not on separate islands. Islands that have no name label, such as the one in sea zone 114, are not game spaces and may not have units moved onto them.
Islands that have no name label, such as the one in sea zone 1, are not game spaces and may not have units moved onto them.
Canals and Narrow Straits
Canals and narrow straits are geographical features that can help or hinder sea movement, depending upon who controls them. Canals are artificial waterways that connect two larger bodies of water, while narrow straits are natural passages that do the same. In either case, control of the land territories surrounding these features gives the controlling power and its allies the ability to travel through them while denying access to enemy powers.
There are two canals on the game board. The Panama Canal connects the Pacific Ocean to the Caribbean Sea (sea zones 64 and 89), while the Suez Canal connects the Red Sea to the Mediterranean Sea (sea zones 81 and 98). A canal is not considered a space, so it doesn’t block land movement. Land units can move freely between Trans-Jordan and Egypt. Central America, containing the Panama Canal, is one territory, so no land movement is required to cross the canal within Central America.
There are three narrow straits on the game board. The Turkish Straits connect the Mediterranean and Black Seas (sea zones 99 and 100), the Strait of Gibraltar connects the Atlantic Ocean to the Mediterranean Sea (sea zones 91 and 92), and the Danish Straits connect the North and Baltic Seas (sea zones 112 and 113). Narrow straits can’t be crossed by land units without the use of transport ships. Turkey is one territory, however, so no land movement or transport ships are required to cross the straits within Turkey.
If your side (but not necessarily your power) controlled a canal or narrow strait at the start of your turn, you may move sea units through it (you can’t use it in the same turn that you capture it). If a canal or narrow strait is controlled by a power not on your side, but with which you are not yet at war, you must ask permission to use it, which may be denied. You can’t move sea units through a canal or narrow strait that is controlled by a neutral territory or by a power with which you are at war. In order to control a canal or narrow strait, you must control its controlling land territory or territories. They are as follows:
Canal/Narrow Straits and Controlling Territories
Suez Canal → Egypt and Trans-Jordan
Panama Canal → Central America
Turkish Straits → Turkey
Strait of Gibraltar → Gibraltar
Danish Straits → Denmark
If there is only one controlling territory, the power that controls it controls the canal or strait. If there are two controlling territories, the side that controls both of them controls the canal or strait. If one side controls one territory and the other controls the other, the canal or strait is closed to sea units. Turkey begins the game as a neutral territory, so neither side may move through the Turkish Straits until Turkey is captured.
Submarines of any power may pass through the Strait of Gibraltar regardless of which power controls it.
The movement of air units is completely unaffected by canals and straits, whether they are moving over land or sea. They can pass between sea zones connected by the canal or strait regardless of which side controls it.
How the war is won
The Axis wins the game by controlling either any 8 victory cities on the Europe map or any 6 victory cities on the Pacific map for a complete round of play (ending with the next turn of the Axis power that captured the final required city), as long as they control an Axis capital (Berlin, Rome, or Tokyo) at the end of that round.
The Allies win by controlling Berlin, Rome, and Tokyo for a complete round of play (ending with the next turn of the Allied power that captured the third capital), as long as they control an Allied capital (Washington, London, Paris, or Moscow) at the end of that round.
Number of players
This game can be played by two to six players. If you control more than one power, keep those powers’ income and units separate. You can conduct operations for only one power at a time. Split control of the powers between the players as follows:
Two players
Player 1: Axis powers / Player 2: Allied powers
Three players
Player 1: Axis powers / Player 2: Soviet Union, United States, and China / Player 3: United Kingdom, ANZAC, and France
Four players
Player 1: Axis powers / Player 2: Soviet Union and France / Player 3: United States and China / Player 4: United Kingdom and ANZAC
Five players
Player 1: Germany and Italy / Player 2: Japan / Player 3: Soviet Union and France / Player 4: United States and China / Player 5: United Kingdom and ANZAC
Six players
Player 1: Germany / Player 2: Japan / Player 3: Italy / Player 4: Soviet Union and France / Player 5: United States and China / Player 6: United Kingdom and ANZAC
Setup
Link the western edge of the Pacific 1940 map with the eastern edge of the Europe 1940 map. The combined board wraps around horizontally: Territories and sea zones on the eastern edge of the map are adjacent to territories and sea zones on the western edge (see “Movement Between Maps,” below).
Set up units as shown on the setup charts found in Pacific 1940 and Europe 1940. Additionally, place the following units:
- Amur: 6 Soviet Infantry
- Sakha: 6 Soviet Infantry and 2 Soviet AAA
- Buryatia: 6 Soviet Infantry
- Egypt: 2 ANZAC Infantry (also, remove 1 United Kingdom infantry)
The powers start with the following IPC income levels and treasuries:
Power Starting Income
Germany 30
Soviet Union 37
Japan 26
United States 52
China 12
United Kingdom – Europe 28
United Kingdom – Pacific 17
Italy 10
ANZAC 10
France 19
You can keep track of IPC treasuries during the game using the IPC Tracking Chart.
Order of Play
Use the following order of play. Powers take their turns in this order regardless of which player controls them.
1. Germany
2. Soviet Union
3. Japan
4. United States
5. China
6. United Kingdom
7. Italy
8. ANZAC
9. France
Your power’s turn consists of six phases, which take place in a fixed sequence. You must collect income if you can, but all other parts of the turn sequence are voluntary. When you finish the collect income phase, your turn is over. Play then passes to the next power.
Turn Sequence
1. Purchase and Repair Units
2. Combat Move (Powers at War only)
3. Conduct Combat (Powers at War only)
4. Noncombat Move
5. Mobilize New Units
6. Collect Income
Phase 1: Purchase & Repair Units
In this phase, you may spend IPCs for additional units to be used in future turns. All the units listed in the mobilization zone on the game board are available for purchase by all powers, except for China, which has limited purchasing options (see ‘China Rules‘).
Purchase Units Sequence
1. Order units
2. Pay for units and repair damaged units and facilities
3. Place units in mobilization zone
Step 1: Order Units
You may purchase as many units of any type as you can afford and will have the ability to mobilize (see “Phase 5: Mobilize New Units”) after making repairs to any damaged industrial complexes (see below). Select all the units you wish to purchase. You don’t have to spend all of your IPCs. The number of pieces in play is not limited by the number of plastic and cardboard pieces available. (If you don’t have any more of a unit type you wish to purchase, use any identifying item, such as a piece of paper with the unit type written on it.
Step 2: Pay for Units and Repair Damaged Units and Facilities
Pay IPCs to the bank equal to the total cost of the units (by having the banker adjust the number of IPCs in your power’s treasury). You can also pay to remove damage from facilities. Facilities are industrial complexes, air bases, and naval bases. Each point of damage costs 1 IPC to remove. Repairs take effect immediately, and the controlling player can use repaired facilities during the rest of this turn. Your capital ships (carriers and battleships) in sea zones serviced by operative friendly naval bases (including those repaired in this turn) are also repaired at this time. There is no IPC cost to repair these ships.
Step 3: Place Units in the Mobilization Zone
Place the purchased units in the mobilization zone (on the game board). You cannot use these units right away, but you will deploy them later in the turn.
Declaring War If there are no restrictions currently keeping you from being at war with a power on the other side (see ‘The Political Situation‘), you may declare war on that power. War must be declared on your turn at the beginning of the Combat Move phase, before any combat movements are made, unless otherwise specified in the political rules. An actual attack is not required. Once a state of war is entered into, all territories and sea zones controlled by or containing units belonging to the power on which you declared war instantly become hostile to your units, and the normal restrictions of moving into or through hostile spaces apply, with one exception. During your Combat Move phase in which you entered into a state of war, your transports that are already in sea zones that have just become hostile may be loaded in those sea zones (but not in other hostile sea zones). In effect, transports may be loaded in their initial sea zones for amphibious assaults before war is declared, while the sea zone is still friendly.
Declarations of war are either “provoked” or “unprovoked.” A declaration of war is considered to be provoked either when the declaration is made in reaction to the direct aggression of another power or when a political rule allows the power to declare war due to a specific action being taken by another power. For example, if the United Kingdom declares war on Japan, a subsequent declaration of war by Japan on the United Kingdom (which is technically unnecessary, as the two powers are already at war) would be considered provoked.
Phase 2: Combat Move – (Powers at War Only)
Movement in this game is separated into combat movement and noncombat movement phases. During the Combat Move phase, all movement must end in a hostile space, with a few exceptions (see below). Movement into a hostile space counts as combat movement whether that space is occupied or not. Additional movement that doesn’t end in a hostile space occurs during the Noncombat Move phase (phase 4).
Move as many of your units into as many hostile territories and sea zones as you wish. You can move into a single hostile space from different spaces, as long as each moving unit can reach that space with a legal move.
You can move units through friendly (but not friendly neutral) spaces en route to hostile spaces during this phase. However, units can’t end their movement in friendly spaces during the Combat Move phase except in four instances.
- Tanks and mechanized infantry that have blitzed through an unoccupied hostile space (see ‘Tanks, Mechanized Infantry, and Blitzing‘).
- Units moving from from an enemy-occupied sea zone to escape combat as their combat move. A sea zone into which defending air units may be scrambled in reaction to an amphibious assault (see ‘Scramble‘) may be treated in the same way as a friendly enemy-occupied sea zone for this purpose.
- Sea units that will be participating in an amphibious assault from a friendly sea zone, as well as sea and/or air units that may be needed to support it in the case that defending air units are scrambled (see ‘Scramble‘).
- Units moving into a sea zone containing only enemy submarines and/or transports in order to attack those units. (Remember that such a sea zone is not considered hostile.)
If you move all of your units out of a territory you control, you still retain control of that territory until an enemy moves into and captures it (the territory remains in control of the power that controlled it at the start of the turn).
Units from the same side can freely share territories and space on aircraft carriers and transports with one another, as long as both powers are at war. They may share sea zones regardless of their status. These shared events must be agreed upon by both powers.
All combat movement is considered to take place at the same time. Thus, you can’t move a unit, then conduct combat, then move that unit again during this phase. The only exception to this is land units making an amphibious assault that is preceded by a sea battle (see ‘Amphibious Assaults‘), as they must offload after the sea battle is successfully completed. You can’t move additional units into an embattled space once an attack has begun.
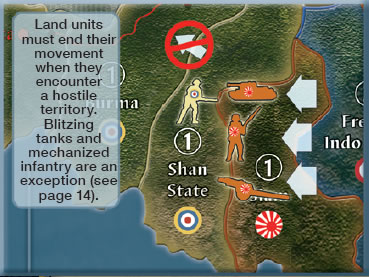
A land or sea unit can move a number of spaces up to its move value. Most units must stop when they enter a hostile space. Thus, a unit with a move value of 2 could move into a friendly space and then a hostile space, or just into a hostile space.
Enemy submarines and/or transports don’t block any of your units’ movement, nor do they prevent loading or offloading in that sea zone (with one exception; see ‘Special Combat Movement: Transports‘). As the moving player, you have the option of attacking any enemy submarines and/or transports that share a sea zone with you. However, if a unit chooses to make such an attack, that unit must end its movement in that sea zone, and it must attack all such units present. In other words, you must either attack all enemy submarines and transports in the sea zone, or you must ignore all of them. You may not attack some enemy units and ignore others in the same sea zone. It is possible that some of your units stop to attack while others continue moving through the sea zone.
Sea Units Starting in Enemy-Occupied Sea Zones
At the beginning of the Combat Move phase, you might already have sea units (and air units on carriers) in spaces containing enemy units that were there at the start of your turn. For example, an enemy might have built new units in a sea zone where you have sea units. When your turn comes around again, you are sharing that sea zone with enemy forces.
If your units are sharing a sea zone with only enemy submarines and/or transports (a friendly sea zone) and you want to ignore them, the normal rules of combat movement apply. However, if they are sharing a sea zone with enemy surface warships (a hostile sea zone), or you are attacking enemy submarines and/or transports there, each of your units must do one of the following:
- Remain in the sea zone and conduct combat,
- Leave the sea zone, load units if desired, and conduct combat elsewhere,
- Leave the sea zone, either to load units or to establish a retreat route, and return to the same sea zone to conduct combat, or
- Leave the sea zone and conduct no combat
Remember, you can only load units in friendly sea zones, so if this sea zone is hostile, you must load them elsewhere.
Once these sea units have moved and/or participated in combat, they can’t move or participate in the Noncombat Move phase of the turn.
Air Units
An air unit that moves in the Combat Move phase must generally reserve part of its move value for the Noncombat Move phase, at which point it must return to a safe landing spot using its remaining movement.
An air unit’s movement in any complete turn is limited to its total move value. Thus, a strategic bomber with a move value of 6 can’t move 6 spaces to get to a hostile space. It must save enough movement points to get to a friendly territory where it can land. A fighter or tactical bomber can move its full 4 spaces to attack in a sea zone instead of saving movement, but only if a carrier could be there for it to land on by the conclusion of the Mobilize New Units phase.
If bombers (strategic or tactical) are moving into territories containing both combat units and facilities, it must be declared which bombers are attacking the combat units and which are attacking the facilities (see “Strategic and Tactical Bombing Raids”). Air units attacking combat units in territories that have AAA (antiaircraft artillery) will be fired upon. This doesn’t include territories containing AAA that are only being flown over. AAA can’t fire upon bombers conducting strategic or tactical bombing raids. These air units are fired on by antiaircraft cover provided by the industrial complex or base that is being attacked.
Amphibious Assaults
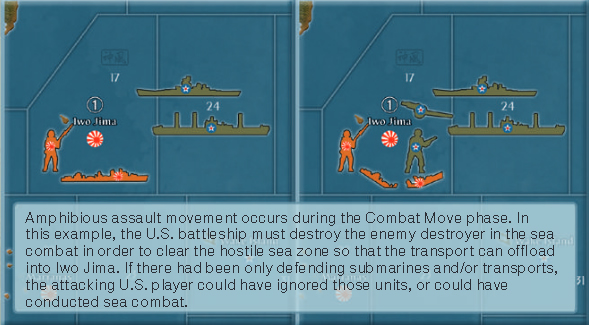
If you want to make any amphibious assaults, announce your intent to do so during the Combat Move phase. An amphibious assault takes place when you attack a coastal territory or island group from a sea zone by offloading land units from transports into that target territory (or make a joint attack with both seaborne units that are offloading and other units from one or more neighboring territories). The sea zone may be either friendly or hostile, but if it is hostile it must be made friendly through sea combat before the amphibious assault can commence.
Moving transports and their cargo into a sea zone from which you plan to make an amphibious assault counts as a combat move, even if there are no defending surface warships there and there is no potential for air units to be scrambled. This is also true of any units that will support the assault. Further, if enemy air units could potentially be scrambled to defend the sea zone, additional units may be moved into the sea zone to combat them in case they are indeed scrambled.
During the Conduct Combat phase, you can launch only amphibious assaults that you announced during this phase.
If an amphibious assault involves a sea combat, any air units participating in the assault must move to either the sea zone or the land territory. They will then participate only in the part of the assault to which they have moved.
Special Combat Movement
A number of units can make special moves during this phase. These are described in detail below.
Aircraft Carriers
Although they don’t have an attack value and aren’t represented on the battle strip, carriers can still participate in an attack and can take hits, as long at least 1 unit with an attack value attacks along with them. Any fighters or tactical bombers on an aircraft carrier launch before the carrier moves and move independently of the carrier. These air units can make a combat move from the carrier’s initial sea zone, or they can remain in that sea zone until the Noncombat Move phase.
Guest aircraft belonging to a friendly power on board another power’s carrier must remain on board as cargo if the carrier moves. They can’t take part in combat and are destroyed if the carrier is destroyed.
Whether it moves during the Combat Move or Noncombat Move phase, an aircraft carrier allows friendly fighters and tactical bombers to land on it in the sea zone where it finishes its move.
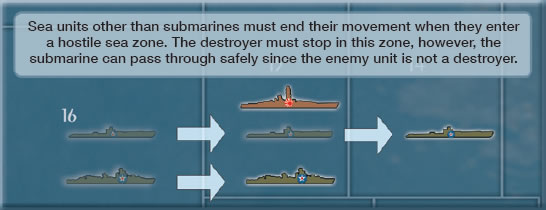
Submarines
Submarines are capable of moving undetected due to their ability to submerge. For this reason, they have special movement rules. If there are no enemy destroyers present, a submarine can move through a sea zone containing enemy warships without stopping. However, if a submarine enters a sea zone containing an enemy destroyer during the Combat Move phase, its movement ends immediately and combat will result.
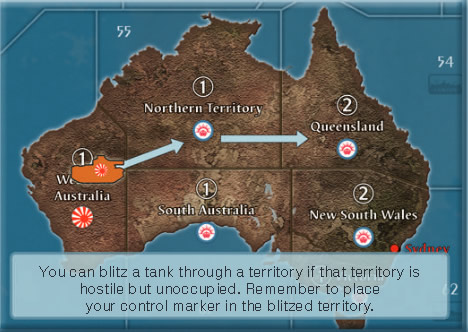
Tanks, Mechanized Infantry, and Blitzing
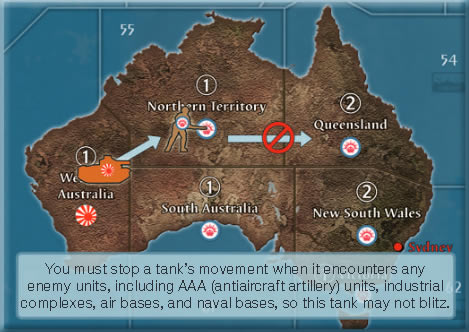
A tank can “blitz” by moving through an unoccupied hostile territory as the first part of a move that can end in a friendly or hostile territory. In addition, 1 mechanized infantry unit can move along with each blitzing tank. The complete move must occur during the Combat Move phase. The blitzing units establish control of the first territory before they move to the next. Place your control marker on the first territory an d adjust the national production levels as you blitz. A tank (or mechanized infantry) that encounters enemy units, including AAA (antiaircraft artillery) units, or an industrial complex, air base, or naval base, in the first territory it enters must stop there and may not blitz.
Transports
If a transport encounters hostile surface warships (not enemy submarines and/or transports) AFTER it begins to move (not counting the sea zone it started in), its movement for that turn ends, and it must stop there and conduct sea combat.
A transport can load units while in any friendly sea zone along its route, including the sea zone it started in. If a transport loads land units during the Combat Move phase, it must offload those units to attack a hostile territory as part of an amphibious assault during the Conduct Combat phase, or it must retreat during the sea combat step of the amphibious assault sequence while attempting to do so. A transport that is part of an amphibious assault must end its movement in a friendly sea zone (or one that could become friendly as result of sea combat) from which it can conduct the assault. However, a transport is not allowed to offload land units for an amphibious assault in a sea zone containing 1 or more ignored enemy submarines unless at least 1 warship belonging to the attacking power is also present in the sea zone at the end of the Combat Move phase.
Any land units aboard a transport are considered cargo until they offload. Cargo can’t take part in sea combat and is destroyed if the transport is destroyed.
Air Bases
When taking off from a territory that has an operative air base, air units gain 1 additional movement point. Fighters and tactical bombers can now move 5 spaces and strategic bombers can move 7 spaces.
All ships beginning their movement from a sea zone serviced by an operative friendly naval base gain 1 additional movement point.
Scrambling is a special movement that the defender can make at the end of this phase. It must be done after all of the attacker’s combat movements have been completed and all attacks have been declared. The attacker may not change any combat movements or attacks after the defender has scrambled.
A quick reaction team of no more than 3 defending fighters and/or tactical bombers (strategic bombers can’t scramble) located on each island or coastal territory that has an operative air base can be scrambled to defend against attacks in the sea zones adjacent to those territories. These air units can be scrambled to help friendly nits in adjacent sea zones that have come under attack. They can also be scrambled to resist amphibious assaults from adjacent sea zones, whether or not the territory being assaulted is the territory containing the air base. They may defend against the enemy ships conducting the amphibious assault even if friendly ships are not present. Air units belonging to powers friendly to the attacked power may be scrambled by their owner if the owning power is at war with the attacking power, so long as the limit of 3 total air units is respected.
In situations where a sea zone is adjacent to more than one territory containing an air base, sea zone 6 and Japan and Korea (assuming one has been built there) for example, each of the territories can scramble up to 3 fighters and/or tactical bombers. In situations where a territory containing an air base is adjacent to more than one sea zone Alaska (assuming one has been built there) and sea zones 1 and 2 for example, the territory may still only scramble up to 3 fighters and/or tactical bombers, but they may be split between the sea zones in any combination.
Scrambled fighters and tactical bombers are defending, so refer to their defense values and abilities when resolving combat. They are treated as normal defending units in their sea zones. As defenders, they may not retreat. They can’t participate in any other battles during that turn, including a battle in the territory from which they were scrambled.
After all combat is completed, each surviving scrambled air unit must return to the territory from which it was scrambled. If the enemy has captured that territory, the unit can move 1 space to land in a friendly territory or on a friendly aircraft carrier. If no such landing space is available, the unit is lost. Surviving scrambled air units land during that turn’s Noncombat Move phase, before the attacker makes any movements.
Powers Not at War with One Another When two powers on opposite sides are not yet at war with one another, they operate under some special conditions and restrictions.
Movement: A power’s ships don’t block the naval movements of other powers with which it’s not at war, and vice versa. They can occupy the same sea zones.
Combat: A power can’t attack a territory controlled by or containing units belonging to a power with which it is not at war. If a power at war attacks a sea zone containing units belonging to both a power with which it’s already at war and a power with which it’s not at war, the latter power’s units are ignored. Those units won’t participate in the battle in any way, and a state of war with that power will not result.
The United States: The United States begins the game neutral, and as such isn’t initially part of the Allies. Being at war with no one and having a strict isolationist policy, the United States has especially tight restrictions. It may not move land or air units into neutral territories. It may not move units into territories or onto ships belonging to another power or use another power’s naval bases, nor may another power move land or air units into its territories or onto its ships or use its naval bases. In addition, the United States may not end the movement of its sea units in sea zones that are adjacent to Japanese-controlled territories
Phase 3: Conduct Combat (Powers at War Only)
In this phase, you conduct combat against opposing units using the following sequence:
1. Strategic and tactical bombing raids
2. Amphibious assaults
3. General combat
A number of units have special rules that modify or overwrite the combat rules in this section.
Kamikaze Strikes
The Japanese player has the ability to make a special defensive strike against Allied surface warships. Japan is allowed to make 6 kamikaze strikes during the game. These strikes can be made only in sea zones that contain the Kamikaze symbol: those surrounding Japan, Okinawa, Iwo Jima, Formosa, Marianas, and Philippines. If an Allied player attacks Japanese units in or declares an amphibious assault from one of these sea zones, the Japanese player can announce at the beginning of this phase that he or she intends to launch one or more kamikaze strikes in that sea zone. They are resolved before any combat begins.
The Japanese player must declare how many kamikaze strikes will be made, in which sea zone(s) they will be used, and which enemy ship will be struck by each kamikaze before any dice are rolled. For each declared strike, 1 Kamikaze token must be spent (no actual air unit is involved) and will be removed from the game after the strike is resolved. A kamikaze strike can target any specific enemy surface warship (not a submarine or transport) belonging to the attacking power. More than one kamikaze strike can be made against the same ship. Kamikaze strikes hit on an attack roll of 2 or less. If a hit is scored, it must be applied to the chosen unit. Surface warships that are destroyed by a kamikaze strike (capital ships still take 2 hits) are immediately removed and will not participate in the subsequent battle. A kamikaze strike prevents offshore bombardment supporting an amphibious assault in that sea zone, whether or not the strike is successful (place the used Kamikaze token in the sea zone until you resolve the amphibious assault to remind you that the ships may not bombard).
Strategic and Tactical Bombing Raids
A strategic or tactical bombing raid is a direct attack on a facility. During this step, you can bomb enemy industrial complexes, air bases, and naval bases with your strategic bombers. You can also bomb enemy air and naval bases (but not industrial complexes) with your tactical bombers. When you damage these facilities, their capabilities are decreased or eliminated, and your enemy must spend IPCs to repair them in order to restore those capabilities. Repairs can be made by the units’ controlling player during his or her Purchase and Repair Units phase.
To conduct a bombing raid, the attacking player moves his or her bombers to the territory on the map containing the target(s). A base may be both strategically and tactically bombed at the same time. Both attacking and defending fighters (not tactical bombers) can also participate in strategic bombing raids as escorts and interceptors.
Escort fighters (those accompanying the attacking bombers) can escort and protect the bombers, and they can originate from any territory or sea zone, range permitting. They can’t participate in any other battles during that turn, including a battle in the territory in which the bombing raid is occurring. This applies whether or not the defender commits any interceptors.
Any number of defending fighters based in a territory that is ab out to be strategically and/or tactically bombed can be committed to participate in the defense of that territory’s facilities as interceptors, whether or not there are attacking fighter escorts. The number of defending fighters that will intercept is decided by t he owning player(s) after the attacker’s Combat Move phase is completed and before the Conduct Combat phase begins. These fighters cannot participate in other battles during that turn, including a battle in the territory in which the bombing raid is occurring. They must remain in their original territory after the battle. If that territory is captured, they can move 1 space to land in a friendly territory or on a friendly aircraft carrier. This movement occurs during the Noncombat Move phase, before the acting player makes any noncombat movements. If no such landing space is available, the fighters are lost.
If the defender has elected to commit fighter interceptors, an a ir battle will be fought immediately before the bombing raid is conducted. Only one air battle is fought in each territory, even if more than one facility in that territory is being bombed. This air battle is resolved in the same way as a normal combat, with the following exceptions:
- The attacking bombers and fighter escorts and the defending fighter interceptors will be the only units participating in this special combat.
- The combat lasts for only one round.
- All of the air units have attack and defense values of 1.
After the air battle is complete, or if there were no defending fighter interceptors, surviving fighter escorts are considered to have retreated. They don’t participate in the actual bombing raid, are not subject to antiaircraft fire, and will remain in the territory until the Noncombat Move phase. Any surviving attacking bombers carry out the bombing raid. If the territory offers more than one target, the bombers may be divided into groups, and each assigned a specific target (tactical bombers may not attack industrial complexes).
Each industrial complex, air base, and naval base has its own antiaircraft system. If there is an AAA (antiaircraft artillery) unit in the targeted territory, don’t roll for it. Those units are used to protect combat units. Each complex and base rolls one die against each bomber directly attacking it (regardless of the number of bombers). For each “1” rolled, a bomber of the attacker’s choice is immediately removed.
After resolving the antiaircraft fire, surviving bombers each roll one die. Add 2 to each die rolled for a strategic bomber (but not for tactical bombers), then total the result. To mark the damage done by the attacking bomber(s), place 1 gray plastic chip under the targeted industrial complex or base per damage point rolled. An industrial complex can’t receive more than 20 total damage for major industrial complexes and more than 6 total damage for minor ones. Air bases and naval bases can’t receive more than 6 total damage. Damage exceeding these limits is not applied.
A bomber that performed a strategic or tactical bombing raid can’t participate in any other combat this turn and must return to a friendly territory during the Noncombat Move phase.
Amphibious Assaults
During this step you will resolve each amphibious assault you announced during the Combat Move phase. If you didn’t announce an amphibious assault, go to ‘General Combat’.
Amphibious Assault Sequence
1. Sea combat
2. Battleship and cruiser bombardment
3. Land combat
Step 1. Sea Combat
If there are defending surface warships and/or scrambled air units, sea combat occurs. If there are only defending submarines and/or transports, the attacker can choose to ignore those units or conduct sea combat.
If sea combat occurs, all attacking and defending sea and air units present must participate in the battle. (Even if the attacker chose to ignore defending subs and/or transports, they will still be involved in the battle if the defender scrambles air units and forces a sea battle.) Conduct the sea combat using the rules for General Combat, then go to step 3 (land combat).
If no sea combat occurs, go to step 2 (bombardment).
Step 2. Battleship and Cruiser Bombardment
If there was NOT a combat in the sea zone from which you are offloading units from transports, any accompanying battleships and cruisers in that sea zone can conduct a one-time bombardment of one coastal territory or island group being attacked. The number of ships that can make bombardment
attacks is limited to 1 ship per land unit being offloaded from the transports into that coastal territory. If more than one territory is being assaulted from the same sea zone and there are multiple battleships and/or cruisers, each ship may support only one assault. However, the ships’ bombardment
may be split in any way that the attacker chooses, so long as the number of ships supporting each assault doesn’t exceed the number of seaborne land units in that assault. Choosing to destroy enemy transports or attacking enemy submarines in step 1 (above), counts as a combat and prevents the battleship
and cruiser bombardment from taking place.
Roll one die for each battleship and cruiser that can conduct bombardment. Battleships hit on a die roll of “4” or less, and cruisers hit on a “3” or less. For each hit, the defender will move a defending unit behind the casualty strip. These casualties will be able to defend during the land combat step before they are eliminated.
Land combat can only take place if there was no sea battle or the sea zone has been cleared of all defending enemy units except transports and submarines that submerged during the sea battle. If the attacker still has land units committed to the coastal territory, move all attacking and defending units
to the battle strip and conduct combat using the General Combat rules. Remember to put casualties from bombardment (if any) behind the casualty strip.
Attacking land units can come from transports (seaborne), and they can come from neighboring territories that are adjacent to the attacked territory. Any land units offloading from a single
transport can only be offloaded into a single hostile territory.
If no land units (carried as cargo) survived the sea combat, or if the attacking sea units withdrew from the sea combat, then any other units that were designated to participate in the land attack (including air units) must still conduct one round of land combat in a regular attack on the intended hostile territory before they can retreat.
If the attacker doesn’t have any attacking land or air units left, the amphibious assault is over.
Keep the attacking overland units and seaborne land units separated on the battle strip. Attacking seaborne units can’t retreat. Attacking overland land units and air units can retreat (between rounds of combat). All attacking overland land units must retreat together as a group. They can only retreat
to a territory from which at least one of them entered the contested territory and must all retreat at the same time and to the same place. A retreat may happen at the conclusion of any round of combat.
Attacking air units, whether involved in the sea combat or the attack on the coastal territory, can retreat according to the attacker retreat rules (see ‘Condition B — Attacker Retreats‘). If there is a retreat, air units and overland units (if any) must retreat at the same time. Air units will land during the Noncombat Move phase.
Air Units
Each attacking air unit can participate in the sea battle or the attack on the coastal territory; it can’t do both. The attacking player must declare which air units are involved in each part of the attack and can’t change their assignments later. Scrambled air units are placed after the amphibious assault is announced and attacking air units (if any) are assigned to the sea battle or the coastal territory. At the end of the amphibious assault, all air units remain in place; they will land during the Noncombat Move phase.
Air units defending in a territory can fight only in that territory. They can’t participate in the sea combat. The exception to this rule is defending fighters and tactical bombers that are on an island or coastal territory that has an operative air base. Such air units can be scrambled to the adjacent sea zone where they participate in its defense. Strategic bombers can’t be scrambled.
General Combat
In this step, you resolve combat in each space that contains your units and either contains enemy units or is enemy-controlled. Combat is resolved by following the General Combat sequence (below). Combat in each space takes place at the same time, but each affected territory or sea zone is resolved separately and
completely before resolving combat in the next contested space. The attacker decides the order of spaces in which each combat occurs. No new units can enter as reinforcements once combat has begun. Attacking and defending units in each space are considered to fire at the same time, but for ease of play you roll dice in sequence: attacker first, then defender.
If you moved any units into unoccupied hostile territories or hostile territories that contain only facilities and/or AAA units, no actual combat is necessary (though AAA units will still fire at attacking air units). Simply skip to step 7 (Conclude Combat) for each of these territories and remove any AAA units that might be in them.
General Combat Sequence
1. Place units along the battle strip
2. Submarine surprise strike or submerge (sea battles only)
3. Attacking units fire
4. Defending units fire
5. Remove defender’s casualties
6. Press attack or retreat
7. Conclude combat
Step 1. Place Units Along the Battle Strip
The battle strip has two sides, labeled “Attacker” and “Defender.” Place all of the attacking and defending land, sea, and/or air units from the battle onto their respective sides aligned with the numbered columns that contain those units’ names and silhouettes. Facilities don’t participate in general combat, as they may be attacked and damaged only by strategic and tactical bombing raids. The number in a unit’s column identifies that unit’s attack or defense value. An attacking or defending unit must roll its column’s attack or defense value or less in order to score a hit.
Some units, such as transports, attacking aircraft carriers, and defending AAA units, have no combat value and are not represented on the battle strip. Place these units beside the battle strip, as they are still participants in the battle and may be taken as casualties.
In a sea battle, place any cargo (whether your own units or an ally’s) beside the transport ship or on the aircraft carrier (guest air units) that is carrying it. Cargo doesn’t roll for hits, nor can it be chosen as a casualty. It’s lost with the ship carrying it if that ship is destroyed.
If you are attacking in a sea zone that already contained friendly units, your ally’s units are not placed along the battle strip, but remain out of play for this turn.
Combined Arms
In some instances, a mix of unit types activates enhanced unit abilities. For example, an infantry unit matched with an artillery unit enables the infantry to attack at 2. See the following chart for details. (See also “Unit Profiles”) Some unit types require one-to-one pairing with another unit type and may be paired with more than one other unit type. Each unit may be paired with only one other unit at the same time, but may be paired with different units at different times during the same turn. For example, an individual artillery unit may not be paired with both an infantry and a mechanized infantry during the same combat round in the Conduct Combat phase in order to make both units attack at 2. However, the same mechanized infantry unit may be paired with a tank during the Combat Move phase in order to blitz, and then be paired with an artillery in the Conduct Combat phase in order to attack at 2.
Infantry + Artillery → Infantry attacks @ 2
Mech. Infantry + Artillery → Mech. Infantry attacks @ 2
Tactical Bomber + Tank → Tactical Bomber attacks @ 4
Tactical Bomber + Fighter → Tactical Bomber attacks @ 4
Mech. Infantry + Tank → Mech. Infantry can blitz
Plane + Destroyer → Plane can hit Subs
Step 2. Submarine Surprise Strike or Submerge (Sea Battles Only)
This step is specific to attacking and defending submarines. Before the general sea battle takes place (steps 3–5), both attacking and defending submarines can choose to either make a Surprise Strike die roll or submerge. A player may choose to submerge all, some, or none of his or her submarines. However, if the opposing side has a destroyer in the battle, the attacking or defending submarines can’t submerge or make a Surprise Strike. Combat proceeds normally with your submarines firing along with your other units in step 3 or 4.
Attacking or defending submarines that choose to submerge are immediately removed from the battle strip and returned to the game board in the contested sea zone, removing them from the remaining battle sequences.
Note: Decisions on whether attacking and defending submarines will fire or submerge must be made before any dice are rolled by either side. The attacking player decides first.
Each attacking submarine conducting a Surprise Strike rolls one die. Attacking submarines that roll a “2” or less score a hit. After the attacking player has rolled for all attacking submarines, the defender chooses 1 sea unit (submarines can’t hit air units) for each hit scored and moves it behind the casualty strip. (Note: undamaged capital ships that are hit only once are not removed.)
Then each defending submarine conducting a Surprise Strike rolls one die. Defending submarines that roll a “1” score a hit. After the defending player has rolled for all defending submarines, the attacker chooses 1 sea unit for each hit scored and removes it from play. (Note: undamaged capital ships that are hit only once are not removed.)
Note: In both cases, attacking or defending, transports can be chosen as casualties only if there are no other eligible units. Submerged submarines can’t be chosen as casualties since they have been removed from the battle.
Once all attacking and defending submarines that conducted a Surprise Strike have fired, the casualties they have generated are removed from the game and this step (step 2) is over for this round of combat. As long as there are attacking and/or defending submarines and no opposing destroyers, this step is repeated during each round of combat. Any hits made during this step that don’t destroy units (such as battleships and carriers) remain in effect until they are repaired.
Step 3. Attacking Units Fire
Roll one die for each attacking unit with an attack value that didn’t fire or submerge in step 2. Roll for units with the same attack value at the same time. For example, roll all units with an attack value of 3 at the same time. An attacking unit scores a hit if you roll its attack value or less. After the attacking player has rolled for all attacking units, the defender chooses 1 unit for each hit scored and moves it behind the casualty strip. All units behind the casualty strip will return fire in step 4. As many hits as possible must be assigned. For instance, if 1 cruiser and 2 submarines attack a carrier with a fighter and score 3 hits, the defender must assign the cruiser hit to the fighter and the submarine hits to the carrier. The defender may not assign the cruiser hit to the carrier, as the subs cannot hit the fighter and 1 sub hit would be lost.
Step 4. Defending Units Fire
Defending units roll one die for each unit with a defense value, including units behind the casualty strip, that didn’t fire or submerge in step 2. Roll for units with the same defense value at the same time. A defending unit scores a hit if you roll its defense value or less.
After the defending player has rolled for each defending unit with a defense value, the attacker chooses 1 unit for each hit scored and removes it from play.
As many hits as possible must be assigned. For instance, if 1 cruiser and 1 submarine are defending against 1 destroyer and 1 fighter and the defender scores 2 hits, the attacker must assign the sub hit to the destroyer and the cruiser hit to the fighter. The attacker may not assign the cruiser hit to the destroyer, as the sub cannot hit the fighter and its hit would be lost.
Specific to Sea Battles: In both steps 3 and 4, submarines that fired in step 2 can’t fire again during the same combat round. If there is an enemy destroyer in the battle, submarines fire in step 3 or 4 rather than step 2. Remember that in sea battles hits from air units can’t be assigned to submarines unless there is a
destroyer that is friendly to the air units in the battle, and hits can only be assigned to transports if there are no other eligible units.
Defenseless Transports
In a sea battle, if the defender has only transports remaining and the attacker still has units capable of attacking, the defending transports are all destroyed, along with their cargo. You don’t have to continue rolling dice until all the transports receive hits. This will speed up combats. This also occurs if the only combat units remaining can’t hit each other. For example, if the defender has only transports and submarines remaining, and the attacker has only air units remaining, the air units and submarines can’t hit each other, so the transports are defenseless. At this point, defenseless transports are all destroyed, along with their cargo. Attacking transports are not usually considered defenseless, since they generally have the option of retreating. If they can’t retreat, they are treated the same as defending transports. Destroying defenseless transports in this way still counts as combat for the purpose of offshore bombardment and similar rules.
Step 5. Remove Defender’s Casualties
Remove the defender’s units that are behind the casualty strip from play. Note: After casualties are removed, it might be necessary to reevaluate certain units’ capabilities that depend upon the presence or absence of other units. For example, infantry units might no longer be supported by artillery units, or submarines might no longer have their abilities cancelled by enemy destroyers that have been removed. These changes will take effect in the following combat round.
Step 6. Press Attack or Retreat
Combat rounds (steps 2–5) continue unless one of the following two conditions occurs (in this order):
Condition A — Attacker and/or Defender Loses All Units.
Once all units that can either fire at a valid target or retreat on one or both sides have been destroyed, the combat ends.
If a power has combat units remaining along the battle strip, that power wins the combat. Players who have units remaining along the battle strip return those units to the contested space on the game board.
In a sea battle, if both sides have only transports remaining, the attacker’s transports can remain in the contested sea zone or retreat per the rules in Condition B below, if possible.
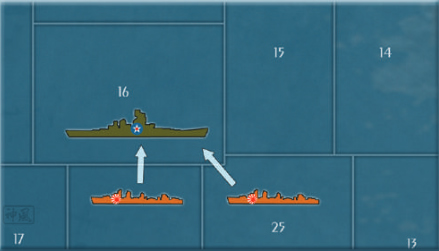
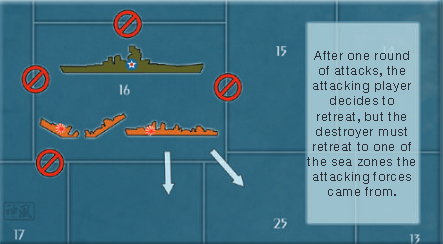
Condition B — Attacker Retreats
The attacker (never the defender) can retreat during this step. Move all attacking land and sea units in that combat that are along the battle strip to a single adjacent friendly space from or through which at least 1 of the original attacking land or sea units moved. In the case of sea units, that space must
have been friendly at the start of the turn (if no such space exists, retreat is not possible). All such units must retreat together to the same territory or sea zone, regardless of where they came from.
Retreating air units remain in the contested space temporarily. They complete their retreat movement during the Noncombat Move phase using the same rules as an air unit involved in a successful battle.
Multinational Forces Units on the same side can share a territory or sea zone, constituting a multinational force. Such forces can defend together, but they can’t attack together. (This doesn’t mean powers can share income: only the power that controls a territory collects income for that territory.)
A multinational force can’t attack the same space together, because each power moves and attacks with its own units only on its own turn. Any units in a sea zone in which a battle occurs that belong to an ally of the attacker (other than cargo on an attacker’s ship) can’t participate in the battle in any way. Such units can’t be taken as losses in the sea combat and have no effect on defending submarines.
An attacking fighter or tactical bomber can launch from an aircraft carrier owned by an ally, but the ally’s carrier can’t move until its owner’s turn. Similarly, an attacking carrier can carry an ally’s fighter or tactical bomber as cargo, but the ally’s air unit can’t participate in an attack by that carrier.
An attacking land unit can assault a coastal territory from an ally’s transport, but only on the turn of the attacking land unit’s owner. All of the normal requirements for transports offloading in a sea zone must still be met by the attacking power (see “Special Combat Movement, Transports”), and any scrambled air units will prevent the landing if they cannot be destroyed.
Transporting Multinational Forces: Transports belonging to a friendly power can load and offload your land units, as long as both powers are at war. This is a three-step process:
1. You load your land units aboard the friendly transport on your turn.
2. The transport’s owner moves it (or not)
on that power’s turn.
3. You offload your land units on your next turn.
Step 7. Conclude Combat
If you win a combat as the attacker in a territory and you have 1 or more surviving land units there, you take control of it. Otherwise, it remains in the defender’s control. (If all units on both sides were destroyed, the territory remains in the defender’s control.) Sea units can’t take control of a territory; they must stay at sea.
Air units can’t capture a territory. If your attack force has only air units remaining, you can’t occupy the territory you attacked, even if there are no enemy units remaining. Air units must return to a friendly territory or carrier during the Noncombat Move phase. Until then, they stay at the space where they fought.
If you have captured the territory, place your control marker on the territory and adjust the national production levels. Your national production increases by the value of the captured territory; the loser’s production decreases by the same amount.
Any industrial complex, air base, and/or naval base located in the captured territory is now controlled by your side (see “Liberating a Territory,” below). If you capture an industrial complex, you can’t mobilize new units there until your next turn. If you capture a major industrial complex, it is immediately downgraded to a minor one. If you capture an air base or naval base, you can’t use the added flight or sea
movement or receive repairs until your next turn. Any damage previously inflicted on a facility remains in place until it is repaired (any damage markers beyond 6 on former major industrial complexes are removed).
Liberating a Territory
If you capture a territory that was originally controlled by another member of your side, you “liberate” the territory. You don’t take control of it; instead, the original controller regains the territory and the national production level is adjusted. Any industrial complex, air base, and/or naval base in that territory revert to the original controller of the territory. A major industrial complex that was downgraded to a minor upon capture is not automatically upgraded upon liberation—it remains minor until the original owner upgrades it.
If the original controller’s (the power whose territory you just liberated) capital is in enemy hands at the end of the turn in which you would otherwise have liberated the territory, you capture the territory instead. You adjust your national production level, and you can use any industrial complex, air base, and/or naval base there until the original controller’s capital is liberated. The capturing player can’t use these newly captured facilities until the player’s next turn.
Capturing and Liberating Capitals
If a power captures a territory containing an enemy capital (Calcutta, Tokyo, Sydney, or Western United States), follow the same rules as for capturing a territory. Add the captured territory’s income value to your national production level.
In addition, you collect all unspent IPCs from the treasury of the original controller of the captured capital. For Example, if Japan conquers India, and the United Kingdom has unspent IPCs, those IPCs are immediately transferred to Japan’s player. You collect these IPCs even if your own capital is in enemy hands.
When capturing Tokyo, signifying Allied victory, you still add the captured territory’s income value to your national production level and you collect any unspent IPCs Japan might have. The Axis player will have until the beginning of your power’s next turn, using his or her existing forces, to try to liberate that capital.
The original controller of the captured capital is still in the game but can’t collect income from any territories he or she still controls and can’t buy new units. The player skips all but the Combat Move, Conduct Combat, and Noncombat Move phases until the capital is liberated. If that power or one on its side liberates the capital, the original controller can once again collect income from territories he or she controls, including territories reverting control to him or her.
If a capital is liberated, the industrial complex, air base, and/ or naval base in that capital territory revert ownership to the original controller of the capital. Other territories and industrial complexes, air bases, and naval bases that were originally controlled by the newly liberated capital’s controller but are currently in the hands of friendly powers also revert control immediately.
You don’t collect IPCs from the controlling power when you liberate a capital. For example, if the United States player liberates Sydney from Japan’s player, the Japan player doesn’t surrender any IPCs.
Capturing a Victory City
Japan wins the game by capturing and controlling 6 victory cities. Players should keep a close eye on Japan’s progress and the number of victory cities of which it has control. If the Japan player controls at least 6 victory cities continuously for one complete round of play, that player wins the war, provided that he or she also controls Tokyo at the end of the round.
Phase 4: Noncombat Move
In this phase, you can move any of your units that didn’t move in the Combat Move phase or participate in combat during your turn. You will also land all your air units that participated in and survived the Conduct Combat phase. This is a good time to gather your units, either to fortify vulnerable territories or to reinforce units at the front.
Your land and sea units can move a number of spaces up to their move values. Your air units can move a number of spaces up to their move values, less the number of spaces they might have moved during the Combat Move phase. Air units that did not move at all during the Combat Move phase may use their entire movement allowance in this phase. Only air units and submarines can move through hostile spaces during this phase.
Stranded defending air units also land during this phase. These are carrier air units whose aircraft carrier has been damaged or destroyed in combat or scrambled air units or fighter interceptors (see “Conduct Combat”) whose original territory is now under enemy control. These units are allowed movement of up to one space to find a friendly territory or carrier on which to land. If no landing space can be found, they are lost. This movement occurs before the acting player makes any noncombat movements.
Where Units Can Move
Land Units: A land unit can move into any friendly or friendly neutral territory, including territories that were captured in the current turn. It can’t move into or through a hostile territory (not even one that contains no combat units but is enemy- controlled) or an unfriendly neutral or strict neutral territory. If the United States isn’t at war, it can’t move its units into territories belonging to another Allied power.
This is the only phase in which AAA (antiaircraft artillery) can move.
Air Units: An air unit must end its move in an eligible landing space. Air units can land in any territory that was friendly (but not friendly neutral) at the start of the current turn.
Only fighters and tactical bombers can land in a sea zone with a friendly carrier present. A landing spot must be available on the carrier. Additionally:
- A fighter or tactical bomber can land in a sea zone (even a hostile one) that is adjacent to an industrial complex you own if you will be mobilizing an aircraft carrier that you previously purchased in that zone during the Mobilize New Units phase.
- In order for a fighter or tactical bomber to land on an existing carrier, both units must END their movement in the same sea zone.
- You must have a carrier move, remain in place, or be mobilized (new carriers only) to pick up a fighter or tactical bomber that would end its noncombat movement in a sea zone. You can’t deliberately move an air unit out of range of a potential safe landing space.
Air units that can’t move to an eligible landing space by the end of the Noncombat Move phase are destroyed. This includes stranded defending air units (see above)
No air units can land in any territory that was not friendly at the start of your turn, including any territory that was just captured or converted from a friendly neutral by you this turn. If the United States isn’t at war, it can’t move its air units into territories or onto aircraft carriers belonging to another Allied power.
Sea Units: A sea unit can move through any friendly sea zone. It can’t move into or through a hostile sea zone.
Unlike other sea units, submarines can move through and even into hostile sea zones in the Noncombat Move phase. However, a submarine must end its movement when it enters a sea zone containing one or more enemy destroyers.
Transports can move to friendly coastal territories and load or offload cargo, unless they loaded, moved, offloaded, or were involved in combat during the Combat Move or Conduct Combat phase.
Aircraft carriers can move to sea zones to allow friendly fighters and tactical bombers to land. They must move there, range permitting, if they didn’t move in the Combat Move phase and the friendly sea zone is the only valid landing zone for the air units. An aircraft carrier and a fighter or tactical bomber must both end their moves in the same sea zone in order for the air unit to land on the carrier.
Phase 5: Mobilize New Units
If you purchased new units, you must now move all of them from the Mobilization Zone on the game board to eligible spaces you have controlled since the start of your turn. You can’t use industrial complexes that you captured or purchased this turn. You can never use an industrial complex
owned by a friendly power.
The number of combat (land, air, or sea) units that can be produced by each industrial complex each turn is limited to 10 for major industrial complexes and 3 for minor ones. (If you are upgrading a minor industrial complex to a major one, you may still only mobilize up to 3 combat units from that industrial complex this turn.) For each damage marker (plastic gray chip) that is under a given industrial complex, one fewer unit can be mobilized from it. Industrial complexes are never destroyed (except in liberated Chinese territories). They can be heavily damaged, however, and can be damaged to the point where they have at least as many damage markers as they have production ability. In this case, no new units can enter the game through that factory until it’s repaired.
Restrictions on Placement
You can place land units and strategic bombers only in territories containing eligible industrial complexes. Land units can’t enter play on transports.
You can place sea units only in sea zones adjacent to territories containing eligible industrial complexes. New sea units can enter play even in a hostile sea zone. No combat occurs because the Conduct Combat phase is over.
You can place fighters and tactical bombers into territories containing an industrial complex controlled by your power from the start of your turn, or on an aircraft carrier owned by your power in a sea zone (even a hostile one) adjacent to a territory with such an industrial complex. The aircraft carrier can be either a new one currently being mobilized, or an existing one already in place. You can’t place a new fighter or tactical bomber on a carrier owned by a friendly power.
Place new facilities in any eligible territory that you have controlled since the start of your turn. Unlike combat units, facilities do not require that an industrial complex be in the territory in which they are mobilized, and they do not count against the number of units that an industrial complex may mobilize (see above) if there is one there. Major industrial complexes can only be built on originally controlled (not captured) territories with an IPC value of 3 or higher. Minor industrial complexes can be built only in territories with an IPC value of 2 or higher. You can’t have more than one facility of the same type (industrial complex, air base, or naval base) per territory. Industrial complexes can’t be built on islands.
In the event that you inadvertently purchased more units than you can actually mobilize due to production limitations, you must return the over-purchased units to the box (your choice
on which units), and the cost of the units is reimbursed to you.
Phase 6: Collect Income
In this phase, you earn production income to finance future attacks and strategies. Look up your power’s national production level (indicated by your control marker) on the National Production Chart. This is the amount of IPC income you have generated. In addition, you might have reached your national objectives. A power reaching its national objectives is experiencing an uplifting positive effect across the board—higher morale coupled with renewed vigor. “This awards your economy an extra boost of 5 or more IPCs per turn and is called “bonus income.” However, before you can actually receive any of this income, you must check for any losses incurred by naval attacks against your shipping routes (see “Conduct Convoy Disruptions”, below).
Once your income, bonus income, and losses from convoy disruptions have been determined, the number of IPCs that your power will actually collect this turn is calculated by adding your income and bonus income, then subtracting any convoy disruption losses from that total. Collect that number of IPCs from the bank by having the banker add it to the total number of IPCs in your power’s treasury.
If your capital is under an enemy power’s control, you can’t collect income or suffer convoy disruptions. A power can’t lend or give IPCs to another power, even if both powers are on the same side.
Conduct Convoy Disruptions
The economy of many nations is based on moving tons of resources across vast spans of ocean. In wartime, and especially during World War II, this movement was vital. Cargo ships (not to be confused with the game’s transport ships, which carry military units) often formed convoys for mutual support and protection. These convoys are subject to attack by enemy warships.
There are three conditions that must exist for this kind of attack to occur:
- The sea zone must have a “Convoy” image,
- The sea zone must be adjacent to one or more of your controlled territories, and
- At least 1 warship belonging to a power with which you are at war must be in the sea zone. (Any ships in the sea zone that belong to you or a friendly power will have no effect on convoy disruption.)
Convoy attacks on “Convoy” sea zones are conducted in the following manner.
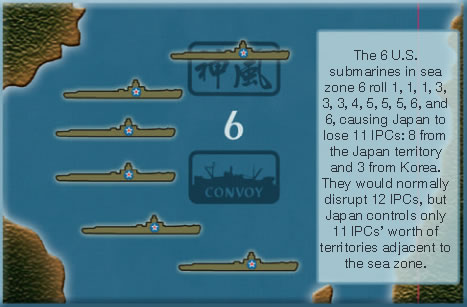
Each enemy warship (except for aircraft carriers) and carrier based air unit in the sea zone might cause the loss of 1 or more IPCs from your income for the turn. The owners of enemy battleships, cruisers, and/or destroyers rolls one die for each such unit, and the owners of enemy submarines and/or air units roll two dice for each such unit. Any rolls of “4” or higher are ignored. The results of these rolls that are “3” or less are totaled, and the resulting number is the total convoy damage suffered in the disruption. However, this number might be limited. Each disrupted convoy can’t lose more IPCs than the total IPC value of your controlled territories adjacent to the sea zone. Also, no single territory can lose more IPCs than its own IPC value from multiple disrupted adjacent convoys (for example, Japan cannot lose more than 8 IPCs from disrupted convoys in sea zones 6 and 19). After these limits are applied, the final total is subtracted from your income for the turn.
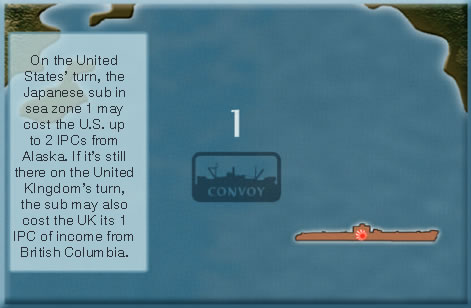
[In the above graphic, “British Columbia” may be “Western Canada” on your board]
A review of the map, specifically looking for such situations, is the responsibility of all the players. This is a step in this phase of the turn. All players should be on the lookout for such convoy attack situations and point them out.
Global United Kingdom rules
One Power, Two Economies
The United Kingdom is one power that has two separate economies: Europe and Pacific. The income levels and IPC treasuries for the two economies are tracked separately. The “Union Jack” national control markers are for tracking the Pacific economy’s income level on the National Production Chart.
The Europe economy includes all of the territories controlled by United Kingdom on the Europe map. London is its regional capital. The Pacific economy includes all of the territories controlled by United Kingdom on the Pacific map. Calcutta is its regional capital. There are two exceptions to this regional division. West India, on the Europe map, is part of the Pacific economy, and the North American territories on the Pacific map are part of the Europe economy.
Research and Development
Either economy can pay all or part of the cost of conducting Research and Development. The results apply to the power as a whole.
Purchase and Repair
Each of United Kingdom Europe and Pacific makes its own separate purchases and repairs.
Combat Moves, Conduct Combat, and Noncombat Moves
All combat moves, combat, and noncombat moves are made or conducted as any other power’s single, united force.
Mobilize New Units
United Kingdom mobilizes its new combat units purchased by each economy at industrial complexes that fall under that economy. It mobilizes its new facilities purchased by each economy in territories that fall under that economy.
Collect Income
Each of the two economies’ incomes should be separately collected and maintained. This includes any income deducted forconvoy disruptions or awarded for national objective income.
Capture of One of the United Kingdom’s Regional Capitals
If one of the regional capitals is captured by the Axis, it will surrender any unspent IPCs that its economy has in its treasury to the capturing power. An economy whose capital is held by the Axis can’t collect income, spend IPCs, or repair units. The free regional capital may never collect IPCs that would normally go to the captured regional capital, even if such territories are recaptured from the Axis. Other Allied powers can temporarily take control of any original United Kingdom territory that would otherwise be liberated when its regional capital (London or Calcutta) has been captured by the Axis.
Capture of an Axis Capital
If Berlin or Rome is captured by the United Kingdom, the IPCs go to the Europe economy’s treasury. If Tokyo is captured, the IPCs go to the Pacific economy’s treasury. This applies even if the receiving economy’s regional capital is held by the Axis.
Movement between Maps
The east and west edges of the boards mark the border lines between territories and sea zones.
The Canadian province of Alberta/Saskatchewan/Manitoba on the Europe map is adjacent to the Western Canada territory on the Pacific map. [Some versions of the game board may show “British Columbia” instead of “Western Canada”]
Central United States is adjacent to Western United States.
Southeastern Mexico is adjacent to Mexico.
The following sea zones are adjacent to one another:
Zone | Adjacent To
11 | 64
28 | 64
51 | 64, 65 & 6652 66
64 | 11, 28 & 51
65 | 51
66 | 51 & 52
Political situation, national objectives, and bonus income
Germany, Japan, and Italy make up the Axis. For the moment, the United Kingdom (including Canada), ANZAC, France, and China make up the Allies. The United States and the Soviet Union are neutral. During this period, many other countries tried to remain neutral as well. As the war became global, many neutrals were forced to join one side or the other.
Germany
With Germany positioned in Holland/Belgium and poised to continue its attack on France, what remains of the French army and some assorted Allied units are all that stands between it and Paris. With the bulk of its army and air force in Belgium, Germany finds itself in no position to attack the Soviet Union, at least for the moment.
Political Situation: Germany is at war with France, the United Kingdom, and ANZAC. Germany may declare war on the United States, the Soviet Union, or China at the beginning of the Combat Move phase of any of its turns. A state of war between Germany and one of these three powers won’t affect its relations with the other two.
National Objective and Bonus Income: Germany’s objective is “Lebensraum” (living space). Extra space was needed for the growth of the German population for a greater Germany. To reflect this objective, Germany collects bonus IPC income during each of its Collect Income phases in the following situations.
When Germany Is Not at War with the Soviet Union: 5 IPCs representing wheat and oil from the Soviet Union. Theme: Beneficial trade with the Soviet Union.
When Germany Is at War with the Soviet Union:
- 5 IPCs for each of the following territories Germany controls: Novgorod (Leningrad), Volgograd (Stalingrad), Russia
- (Moscow). Theme: High strategic and propaganda value
- 5 IPCs if an Axis power controls Caucasus. Theme: Control of vital Soviet oil production.
When Germany Is at War with the United Kingdom and France:
- 5 IPCs if at least 1 German land unit is in Axis-controlled Egypt. Theme: Gateway to the Middle East oilfields (high propaganda value).
- 5 IPCs if Germany controls both Denmark and Norway while Sweden is neither pro-Allies nor Allies-controlled. Theme: Access to iron ore and other strategic resources
- 2 IPCs for each of the following territories Germany controls: Iraq, Persia, Northwest Persia. Theme: Access to strategic oil reserves.
Soviet Union
The country is recovering from Stalin’s deep purge of its military officer corps, which has shaken the Red Army to its very core. Combine this with its recent military disaster in Finland, and we find the Soviet Union more than happy to enter into a secret agreement with Germany. This secret agreement, known as the Molotov-Ribbentrop Pact, assures that the Soviet Union will remain neutral should Germany go to war in Europe. It also permits each power to expand its sphere of influence in Eastern Europe without interference from the other. In the East, the Soviet Union, along with Mongolia, has recently concluded a border war with Japan (see below), which ended in a cease-fire agreement.
Political Situation: The Soviet Union begins the game at war with no one. The Soviet Union may not declare war on any European Axis power before turn 4 unless first declared war upon by a European Axis power or London is captured by an Axis power. It may declare war on Japan at the beginning of the Combat Move phase of any of its turns.
Due to its separate treaties with Germany and Japan, the Soviet Union is in a unique position in its relationship with the Axis powers. As a result, if the Soviet Union is at war with Axis powers on only one map, it is still under the restrictions of being a neutral power (see ‘Powers Not at War with One Another‘) on the other map, and Axis powers on the other map are also still under those restrictions regarding the Soviet Union on both maps. For example, a state of war with only Japan lifts the neutrality restrictions from the Soviet Union on the Pacific map only, and allows Japanese units to attack or fly over
Soviet-controlled territories on either map. However, the Soviet Union is still restricted on the Europe map, and Germany and Italy must still treat the entire Soviet Union as a neutral power, and may not move units into or through any original Soviet territories or Soviet-controlled territories. At the same time, Allied powers may move units into or through Pacific original Soviet territories and Soviet-controlled territories, but not European ones.
National Objective and Bonus Income: Fear of foreign invasion grows by the day in Moscow. The Soviet Union’s objective is a security buffer of foreign territory. To reflect this objective, the Soviet Union collects bonus IPC income during each of its Collect Income phases in the following situations.
When the Soviet Union Is at War in Europe:
- 5 IPCs if the convoy in sea zone 125 is free of Axis warships, Archangel is controlled by the Soviet Union, and there are no units belonging to other Allied powers present in any territories originally controlled by the Soviet Union. Theme: National prestige and access to Allied Lend-Lease material.
- 3 IPCs for each territory that the Soviet Union controls that was originally German, Italian, or pro-Axis neutral. Theme: Propaganda value and spread of communism.
- 10 IPCs (one time only) the first time the Soviet Union controls Germany (Berlin). Theme: National prestige.
Japan
Political Situation:
At the beginning of the game, Japan is at war only with China. Japan considers movement of units into or
through China by any other Allied power as an act of war against it. When not yet at war with the United States, in addition to the normal restrictions (see ‘Powers Not at War with One Another’), Japan may not end the movement of its sea units within 2 sea zones of the United States’ mainland territories (Western United States and Alaska). Japan may declare war on the United Kingdom, ANZAC, the United States, France, or the Soviet Union at the beginning of the Combat Move phase of any of its turns. A declaration of war by Japan against either the United Kingdom or ANZAC will immediately result in
a state of war between Japan and both of those powers. A state of war between Japan and France or between Japan and the Soviet Union will not affect relations between Japan and the United States, and vice versa. Japan may attack Dutch territories only if a state of war exists between it and the United Kingdom and ANZAC.
National Objective and Bonus Income: Japan’s objective is “The Greater East Asia Co-Prosperity Sphere” (Asia for the Asians). To reflect this objective, Japan collects bonus IPC income during each of its Collect Income phases in the following situations:
When Japan Is Not at War with the United States: 10 IPCs if Japan is not at war with the United States, has not attacked French Indo-China, and has not made an unprovoked declaration of war against United Kingdom/ANZAC. Theme: Strategic resource trade with the United States.
When Japan Is at War with the Western Allies (United States, United Kingdom-ANZAC and/or France):
- 5 IPCs if Axis powers control all of the following territories: Guam, Midway, Wake Island, Gilbert Islands, Solomon Islands. Theme: Strategic outer defense perimeter.
- 5 IPCs for each of the following territories Axis powers control: India (Calcutta), New South Wales (Sydney), Hawaiian Islands (Honolulu), Western United States (San Francisco). Theme: Major Allied power centers.
- 5 IPCs if Axis powers control all of the following territories: Sumatra, Java, Borneo, Celebes. Theme: Strategic resource centers.
United States
The United States, wanting to remain neutral, nonetheless has strong pro-Allies sentiments. Separated from world conflicts by two great oceans, it’s particularly anxious to not once again get involved in another European war only twenty-some years after the last one. With its military standing ranked no higher than 12th or 14th in the world, and with a serious isolationist mood in the country, only with the outrage felt by its people by a sudden and deliberate attack by an Axis power will the United States end its neutrality and go to war. However, the growing danger presented by the strengthening of the Axis powers may soon force it to reconsider this position.
Political Situation: The United States begins the game at war with no one. In addition to the normal restrictions (see ‘Powers Not at War with One Another’), while it’s not at war with Japan, the United States may not move any units into or through China or end the movement of its sea units in sea zones that are adjacent to Japan-controlled territories. While not at war with Germany or Italy, the United States may end the movement of its sea units on the Europe map only in sea zones that are adjacent to U.S. territories, with one exception: U.S. warships (not transports) may also conduct long-range patrols into sea zone 102. The United States may not declare war on any Axis power unless an Axis power either declares war on it first or captures London or any territory in North America, or Japan makes an unprovoked declaration of war against the UK or ANZAC, after which it may declare war on any or all Axis powers on its following turn. However, if it’s not yet at war by the Collect Income phase of its third turn, the United States may declare war on any or all Axis powers at the beginning of that phase. This is an exception to the rules for declaring war, which may normally be done only at the beginning of the Combat Move phase (and which the United States may still opt to do on its fourth or later turn).
National Objective and Bonus Income: The objective of the United States is to become “the Arsenal of Democracy” and defeat the Axis powers. To reflect this objective, the United States collects bonus IPC income during each of its Collect Income phases in the following situations:
When the United States Is at War:
- 10 IPCs if the United States controls all of the following territories: Eastern United States, Central United States, Western United States. Theme: Basic national sovereignty.
- 5 IPCs if the United States controls all of the following territories: Alaska, Aleutian Islands, Hawaiian Islands, Johnston Island, Line Islands. Theme: National sovereignty issues.
- 5 IPCs if the United States controls all of the following territories: Mexico, South Eastern Mexico, Central America, West Indies. Theme: Defense treaty and trade obligations
- 5 IPCs if the United States controls Philippines. Theme: Center of American influence in Asia.
- 5 IPCs if there is at least 1 United States land unit in the territory France. Theme: Great Alliance collaboration.
China
Japanese expansion into China in the early 1930s was designed to not only control China’s resources, but also to eliminate British, American, and Soviet influence in the area. Japan wants to isolate China from all external aid.
Political Situation: China begins the game at war with Japan. China can’t declare war on a European Axis power unless one of those powers first either declares war on China or moves units into a territory into which Chinese units are allowed to move. A state of war between China and one Axis power won’t affect its relations with the other Axis powers.
National Objective and Bonus Income: China’s objective is to resist Japanese expansion into China and establish support from other powers in the struggle against Japan. To reflect this objective, China collects bonus IPC income during each of its Collect Income phases in the following situation.
When China Is at War: 6 IPCs if the Burma Road is totally open. Allied powers must control India, Burma, Yunnan, and Szechwan for this to occur. China is also permitted to purchase artillery (represented by U.S. pieces) if the Burma Road is open. Theme: Chinese military supply line corridor.
United Kingdom
The United Kingdom has barely completed the evacuation of its own as well as Allied forces from Dunkirk. An invasion of the United Kingdom looms as a real possibility. The Battle of Britain is about to commence.
Political Situation: The United Kingdom, along with France, begins the game at war with Italy and Germany. The United Kingdom may declare war on Japan at the beginning of the Combat Move phase of any of its turns, resulting in a state of war between Japan and both the United Kingdom and ANZAC. When not yet at war with Japan, in addition to the normal restrictions (see ‘Powers Not at War with One Another’), the United Kingdom may not move units into or through China. It may, however, take control of Dutch territories (gaining their IPC income) by moving land units into them as a noncombat movement, as long as they have not yet been captured by an Axis power. Additionally, the United Kingdom considers attacks against any Dutch territories to be acts of war against it directly.
National Objective and Bonus Income: The United Kingdom’s objective is “The British Empire”—to retain control of its old centers of power. To reflect this objective, the United Kingdom Europe and Pacific economies (see ‘Global United Kingdom Rules‘) collect bonus IPC income during each of the United Kingdom’s Collect Income phases in the following situations.
When the United Kingdom Is at War in Europe (awarded to the Europe economy): 5 IPCs if the United Kingdom controls all of its original territories in its European economy. Theme: Maintenance of the empire considered vital national objective.
When the United Kingdom Is at War with Japan (awarded to the Pacific economy): 5 IPCs if the United Kingdom controls both Kwangtung and Malaya. Theme: Maintenance of the empire considered vitalnational objective.
Italy
Political Situation: At the beginning of the game, Italy is at war with France, the United Kingdom, and ANZAC. Italy may declare war on the United States, the Soviet Union, or China at the beginning of the Combat Move phase of any of its turns. A state of war between Italy and one of these three powers will not affect its relations with the other two.
National Objective and Bonus Income: Italy’s objective is “Mare Nostrum” (Our Sea). Mussolini wanted to reestablish the greatness of the Roman Empire. This could best be demonstrated by controlling the entire Mediterranean basin. To reflect this objective, Italy collects bonus IPC income during each of its Collect Income phases in the following situations.
When Italy Is at War:
- 5 IPCs if Axis powers control at least 3 of the following territories: Gibraltar, Southern France, Greece, Egypt. Theme: Stated national objectives—Greater Roman Empire.
- 5 IPCs if there are no Allied surface warships in the Mediterranean sea (sea zones 92 through 99). Theme: Propaganda and strategic advantage.
- 5 IPCs if Axis powers control all of the following territories: Morocco, Algeria, Tunisia, Libya, Tobruk, Alexandria. Theme: Stated North African military objectives.
- 2 IPCs for each of the following territories Italy controls: Iraq, Persia, Northwest Persia. Theme: Access to strategic oil reserves.
ANZAC
Tension and suspicion of Japanese military expansion in Asia undermines the Australian–New Zealand Army Corps’s sense of security.
Political Situation: ANZAC begins the game at war with Germany and Italy, both of which are on the other side of world. ANZAC may declare war on Japan at the beginning of the Combat Move phase of any of its turns, resulting in a state of war between Japan and both ANZAC and the United Kingdom. When not yet at war with Japan, in addition to the normal restrictions (see ‘Powers Not at War with One Another’), ANZAC may not move units into or through China. It may, however, take control of Dutch territories (gaining their IPC income) by moving land units into them as a noncombat movement, as long as they have not yet been captured by an Axis power. Additionally, ANZAC considers attacks against any Dutch territories to be acts of war against it directly.
National Objective and Bonus Income: ANZAC’s objective is to assist the United Kingdom militarily and assure its own defense of Australia and New Zealand. To reflect this objective, ANZAC collects bonus IPC income during each of its Collect Income phases in the following situations.
When ANZAC Is at War with Japan:
- 5 IPCs if an Allied power controls Malaya and ANZAC controls all of its original territories. Theme: Malaya considered strategic cornerstone to Far East British Empire.
- 5 IPCs if the Allies (not including the Dutch) control all of the following territories: Dutch New Guinea, New Guinea, New Britain, Solomon Islands. Theme: Strategic outer defense perimeter.
France
France finds itself fighting for its very existence, and if history repeats itself, it will fall to a successful German invasion.
Political Situation: France is at war with Germany and Italy. France may declare war on Japan at the beginning of the Combat Move phase of any of its turns.
Controlling Player: The player controlling France will manage all the events related to France that occur during any power’s turn. France will be managed as a separately controlled power, including the French IPC economy. For purposes of simplification, this game doesn’t deal with the German installment of the Vichy government in France.
Troop Bonus: When the territory France is liberated by the Allies, the player controlling France immediately places his or her choice of up to 12 IPCs’ worth of any French units on the territory France for free. This happens only once per game. Theme: National liberation and national prestige.
Dutch Territories
The Dutch territories begin the game uncontrolled by any power. However, they are considered friendly to the Allied powers. Holland has been captured by Germany, so Dutch territories are treated in the same way as any Allied territories whose capital is held by an enemy power (see ‘Liberating a Territory‘), with the exception of the guardianship of United Kingdom and ANZAC.
Neutral Territories
In 1940, many countries, including the United States, tried to remain neutral. As the war became truly global, many neutrals were forced to join one side or the other. The only neutral territories in the game are those that make up Mongolia. All but two of them have their own standing army. These forces are shown on the map in the form of an infantry silhouette with a number next to it. These numbers indicate the number of infantry units that will be placed on the map if and when the territory’s neutrality is compromised. These units are placed free of charge. An important concept to understand is the difference between a neutral territory and a neutral power. There are only five powers in the game (Japan, the United States, China, the United Kingdom, and ANZAC). While one of these powers (the United States) begins the game neutral, neutral territories begin the game not being controlled by any power. Unlike powers, war is never declared on neutral territories—they are simply attacked.
Moving into a neutral territory is considered a combat move, and any combat must be resolved during the conduct combat phase (see ‘Combat Move‘). Before the neutral territory can be taken control of by the invading power, all of the neutral’s standing army units must be eliminated. Air units can’t fly over a neutral unless they are attacking it.
When a neutral territory is invaded, it’s no longer considered neutral and immediately becomes hostile to the alliance of the power that attacked it and friendly to the opposing alliance. For example, if Japan attacked Buyant-Uhaa, Buyant-Uhaa would join the Allies. Also, its standing army units are immediately
placed in it. Choose any power from among those on the side that the territory has joined, and use that power’s infantry units to represent these forces. The player that controls the chosen power
will control the territory’s units for the duration of the battle. This player places the territory’s units on the board and manages them when they conduct combat. Don’t mix or confuse the territory’s units with the units of another power, including the power managing the territory’s pieces on the board.
If the attack upon the formerly neutral territory is unsuccessful (the territory is not captured), any remaining defending units stay in the territory but can’t move. The territory remains uncontrolled (place a national control marker on it face down to indicate its new status) but is considered friendly to powers on the side it’s now allied with. Units belonging to those powers can move into it and take control of it and its remaining units in the same way as if it were a “friendly neutral” (see below)
Friendly Neutrals: The first attack by either side on a neutral territory (whether successful or not) results in all remaining neutral territories immediately becoming friendly to the other side. For example, if Japan attacks Buyant-Uhaa, all of the other neutral territories on the map would become friendly to the Allies. These territories are still neutral, but they can now be converted to the side that they are friendly to. Powers on the side to which the neutral territories are not friendly continue to treat the territories as neutral.
A power may not attack a friendly neutral nor fly air units over it. However, a power that is at war may move land units into (but not through) a friendly neutral as a noncombat move (see ‘Noncombat Move‘). This moves the territory out of its neutral status at the end of the Noncombat Move phase. The
first friendly power to do so places its national control marker on the former friendly neutral territory. With the territory’s loss of neutrality in this way, its standing army is immediately activated. The units placed belong to the power that now controls the formerly neutral territory, and may be used freely
beginning on that power’s next turn.
Once any formerly neutral territory becomes controlled by a power, the rules regarding neutral territories no longer apply to it. It’s treated like any other territory, with the exception that it has no “original” controller. In other words, it may only be captured, and never liberated (see ‘Liberating a Territory‘).
China Rules
China and its units are controlled by one of the Allied players, but for game purposes it is considered a separate power and its resources cannot be mixed with those of other Allied powers. Chinese territories on the game board have a Nationalist Chinese emblem on them. Some of these territories begin the game already under Japanese control. They still are considered Chinese territories for purposes of original ownership.
Unlike the other powers in the game, China is not an industrialized nation and has a rural economy and decentralized government. As a result, China does not have a capital like other powers do. If all Chinese territories are captured by Japan, China retains its unspent IPCs in hope of liberation and does not give them to Japan. In addition, China may spend IPCs only to purchase infantry units (with one exception, see below) and does not use industrial complexes. New Chinese units can be mobilized on any Chinese territory that is controlled by China, including those captured in the current turn. If a Japanese industrial complex is built on a Chinese territory and that territory is later recaptured by the Chinese or liberated by another Allied power, the industrial complex is removed from the game. China is not subject to convoy disruptions (see ‘Conduct Convoy Disruptions‘).
While being invaded by Japan, China is also fighting a civil war. This limits China’s interests to matters within its own borders, resulting in a limited range of occupation for Chinese units. They can be moved only into territories that have a Nationalist Chinese emblem. However, Kwangtung and Burma are special cases. Although they are not Chinese territories, Chinese forces can move into them. These are the only non-Chinese territories that Chinese units can occupy. China can even temporarily control them, but only if it recaptures them from the Axis while India is under Axis control. Chinese units cannot be loaded onto transports.
If China captures a territory containing an air or naval base (see “Air Bases” and “Naval Bases”), China takes control of the base. It can use an operative air base to extend its fighter’s movement range by one (but not to scramble it), but it cannot use a naval base or repair damage to any base. Of course, other Allied powers may use Chinese-controlled bases normally.
The Burma Road is vital to the Chinese war effort (see map). When all of the territories this road passes through are controlled by the Allies during China’s Collect Income phase, China receives a bonus income of 6 IPCs per turn. Even without an industrial complex, China can purchase and mobilize artillery, but only if the road is open during China’s Purchase and Repair Units phase. These artillery units will be supplied by the United States player (because China does not have any of its own), but are considered to be Chinese units in all respects.
At the beginning of the game, China has a United States fighter unit located on the map. This represents the American volunteer group the Flying Tigers. This fighter is considered part of the Chinese forces for purposes of movement and combat. It cannot leave the territories that Chinese occupation is restricted to, even to attack and return. If it is destroyed, the US player cannot replace this fighter unit for China.
Additional rules
The industrial complexes in Eastern United States, Central United States, and Western United States begin the game as minor complexes. They are upgraded to major complexes at no cost when the United States enters a state of war and may be used as such immediately. They may be upgraded prior to that time in the normal way.
San Francisco is not considered to be a capital, so the United States doesn’t lose its unspent IPCs if Western United States is captured by an enemy power.
Soviet-Mongolian Defense Pact: Due to their mutual border conflict with Japan in 1939, the Soviet Union and Mongolia have a special relationship. The Mongolian territories (Olgiy, Dzavhan, Tsagaan-Olom, Central Mongolia, Ulaanbaatar, and Buyant-Uhaa) will never become pro-Axis unless one or more of them is attacked by the Soviet Union. Also, if Japan attacks any Soviet-controlled territory that is adjacent to any Mongolian territory, all Mongolian territories that are still strict neutral or pro-Allies, or have joined the Allies as a result of a failed Japanese attack, will be placed under the control of the Soviet Union at the end of Japan’s Conduct Combat phase. This will be done in the same manner as though the Soviet Union had moved land units into a friendly neutral territory (see ‘Friendly Neutrals‘). These territories will have Soviet control markers placed on them, and their standing army units will be placed on the board using Soviet pieces and will be controlled by the Soviet Union player from then on. This will occur regardless of the state of relations between the Soviet Union and Japan at the time of the attack, with one exception: If the Soviet Union has attacked Korea or any Japanese-controlled territory bordering these Mongolian territories while Mongolia was still a strict neutral, Mongolia will remain neutral and not
ally itself with the Soviet Union.
In all other respects and for all other purposes, the Mongolian territories are treated as any other strict neutral territory. For example, if a Mongolian territory is attacked by Japan while still a strict neutral, all of the other strict neutral territories will become pro-Allies.
Optional rule: Research and development
Using this rule, you may attempt to develop improved military technology. If you decide to use Research & Development, it becomes the new phase 1 of the turn sequence, bumping the other phases up a number.
China may not do Research and Development.
Research and Development Sequence
1. Buy research dice
2. Roll research dice
3. Roll breakthrough die
4. Mark developments
Step 1: Buy Research Dice
Each research die costs 5 IPCs. Buy as many as you wish, including none.
Step 2: Roll Research Dice
Roll each of your purchased research dice.
Success: If you roll at least one “6”, you have successfully made a technological breakthrough. Continue to step 3.
Failure: If you don’t roll a “6”, your research has failed.
Step 3: Roll Breakthrough Die
If your research was successful, choose one of the two breakthrough charts (below and next page) and roll a die to see which technological advance you get. If you roll an advance that you already have, roll again until you get one that you don’t have.
Step 4. Mark Developments
If your research was successful, place one of your national control markers inside the appropriate advancement box on the Research and Development chart. Your development becomes effective immediately.
Any number of powers may develop the same technology, but powers can’t share their technology.
Breakthrough Chart 1
1. Advanced Artillery. Each of your artillery units can now provide greater support. One artillery unit can support up to 2 infantry and/or mechanized infantry units per attack. Up to 2 infantry and/or mechanized
infantry units when coupled with 1 artillery unit have attack values of 2.
2. Rockets. Your air bases can now launch rockets. During the Strategic and Tactical Bombing Raids step of your Conduct Combat phase each turn, each of your operative air bases can make a single rocket attack against an enemy industrial complex, air base, or naval base within 4 spaces of it. This attack does one die
roll of damage to that facility. Rockets may not be fired over neutral territories.
3. Paratroopers. Up to 2 of your infantry units in each territory with an operative friendly air base can be moved to an enemy-controlled territory 3 or fewer spaces away that is being attacked by your land units from adjacent territories and/or by amphibious assault. When moving, paratroopers must obey the same restrictions that air units do. If the territory being attacked has AAA (antiaircraft artillery) units, the paratrooper infantry units are subject to antiaircraft fire in the same way as air units. If attacking along with land units from adjacent territories, paratroopers may retreat as normal.
4. Increased Factory Production. Each of your industrial complexes can now produce additional units beyond their normal production ability. Major industrial complexes can mobilize up to 12 units, and minor one scan mobilize up to 4 units. Also, when repairing a damaged industrial complex, you can remove 2 damage markers for the cost of 1 IPC (in other words, half price). The maximum damage that can be applied to your industrial complexes is not increased.
5. War Bonds. During your Collect Income phase, roll a die and collect that many additional IPCs.
6. Improved Mechanized Infantry. Each of your mechanized infantry units that is paired up with a tank or an artillery now has an attack value of 2. Also, your mechanized infantry may now blitz without being paired
with a tank.
Breakthrough Chart 2
1. Super Submarines. The attack value of your submarines is now 3 instead of 2.
2. Jet Fighters. The attack value of your fighters is now 4 instead of 3. In addition, during bombing raids your escorting or intercepting fighters now hit on a “1” or “2” instead of just a “1”.
3. Improved Shipyards. Your sea units are now cheaper to build. Use these revised costs:
Unit | IPC cost
Battleship | 17
Aircraft Carrier | 13
Cruiser | 9
Destroyer | 7
Transport | 6
Submarine | 5
4. Radar. Your fire, both from AAA (antiaircraft artillery) units and facilities, now hits on a “1” or “2” instead of just a “1”.
5. Long-Range Aircraft. All of your air units’ ranges are increased by one space.
6. Heavy Bombers. Your strategic bombers are now heavy bombers. When attacking, whether in a battle or a strategic bombing raid, roll two dice for each bomber and select the best result.
Can a mechanized infantry make a blitz …WITHOUT a tank?
On defence…can an allied fighter/bomber(not strategic) participate in the battle.
ie. UK fighter on USA carrier…being attacked by german ships.
Can UK fighter participate in combat.
Mike B, I hope as it’s been a few years now, was able to understand the politics in your question. I noticed you got your answer below from Will, not accurate timing but Will is correct on the answer.
Hope you have been gaming in the last few years!
Cheers, Jon
Yes
No, regarding the Mech blitzing.
Yes, regarding the fighter, or other allied units on defense, as long as they are allies and in the war. Sometimes Russia is not yet in the war, but they have a sub lurking alongside British ships. In this case, the sub does not defend.
Hello WIll,
Thank-you for the response to the question above, the rules are real tricky but it does make sence. Hope you have been gaming, or a game rumbles in the future. Glad you found us here as we try to make to make things clear and easy to read!
Take it easy, Jon.
Mech can’t blitz without a tank, unless you’ve researched improved mech infantry. Then they can without a tank.
They can blitz, without a tank, through a friendly territory first and then attack an enemy territory or go through two friendly territories.
thats not blitzing, blitzing refers to moving through unoccupied hostile territory
When subs attack a hostile sub ,does the hostile get to submerge first ,and avoid attack entirely
As far as I know, subs can’t see enemy subs to attack them in the first place, unless there is a destroyer present, in which case they can’t dive anyway.
Hi Ewan,
Thanks for replying to the Sub question! Hope your games are going well. We will be adding a few features to the mobile app.
Jon
Hi Don C,
I hope you got your answer in time for your game. Destroyer’s are the key to ANY enemy Sub in the water. You have to think logically. Destroyers drop Depth Chargers which bring them to the surface, meaning then AIr can also attack.
The moment the player removes it’s last destroyer as a hit, then your subs can submerge if the attack is another round.
Happy gaming, Jon
Russia start not in war with the Axis and cannot attack axis unless attacked first.. But does attacking a Neutral Pro Axis nation (as Finland) count as an attack at Axis? or is this move legal?
Axis taking a Pro-Axis nation (Finland) or attacking a Pro-Allies nation (Yugoslavia) is not considered an act of war against Russia or the United States.
Hi Klykke,
I am pretty sure to your question, Russia can not attack any Pro Axis at all while it’s not at war. Did you find out the answer? My hunch is what have said.
Hope your game went well! Jon
If an Axis power attacks a Pro-Allies country (Or vice versa) that haves a standing army, which power does the infantry units of that army join?
If Russia is not at war with the axis, may they still capture neutral territories (pro-allied? Pro-axis?)
If not, then when playing global, does declaring war on Japan allow Russia to capture neutral territories like Iraq or at least northwestern Persia?
Hi Silas,
Sorry for a late reply, but i gather you got your answer!
Russia not at war can not do nothing other than collect income, wait to see what Japan or mainly really, Germany is upto.
As from what I understand, If Russia declared War on Japan, then decides to attack Iraq, it would be an un provoked declaration of War on Germany. So you’ll end up being at War with both Japan and Germany.
Lemme know if you found out the actual answer!! Jon.
Hi Tymur,
Sorry for contacting you now, but I assume you managed to get your answer.
If attacking an enemy pro-neutral territory , the defenders is that standing Army ( reserves say ). They are defending as soldiers. Once the enemy wins the territory, no extra men are added.
However, if the same side walks into that Pro-Neutral territory, those infantry units belong to that friendly who released that pro-neutral.
A game play tip: No air units can fly over any pro-neutral territory ( un-activated ), but once it is attacked the territory is now open to air. This means that the attacking player may retreat BUT now any air units can fly over that pro neutral teritory.
Hope your game ended well! Jon
As China’s capital, Shanghai, is occupied by the Japanese can the USA capture a Chinese territory, Manchuria, and build an American industrial complex on it?
Hi Elmer
China has no Capital, this is why they can’t really build anything but infantry ( or artillery if Burma Road is open ).
Japan can build industry complex’s ( minor only ) by all means in those capitals in China, BUT once the Allies re capture it, the complex, they are immediately removed. No industry complex by the Allies can be built.
However, If the Japanese built any Air Bases or Navy Bases, these remain throughout the rest of the game, and the Allies can take advantage of this.
However, Hong Kong is a different matter, as it is in Chinese land, it’s ownership is the British, as the UK . Only the UK can build a complex in there. Once built and captured by Japan, if a major, it gets reduced to a Minor.
China gets a little more depth and confusing when UK Pacific is captured, and that brings a new circumstances on who does what in China.
Hope that helps, sorry a late reply my friend.
Jon
Great resource!
Hi there trulpen,
We are happy you find these mobile friendly rules ideal. We are looking to advance a few added items, we are not sure of yet, but we want to make players make good use of this feature we provide. Hope your game went well!
Jon
Neither Russia nor the US may capture neutral territories until they join the war. Russia, with its special rules, cannot capture Middle Eastern territories or attack Finland until it is at war with either Germany or Italy or both – being at war with Japan does not affect their relations with the European Axis powers.
Chinese territories can never be captured by Allied powers – they don’t technically have a capital so in the mentioned example, the US would liberate Manchuria and China would gain the income from it and be able to place units there.
Hopefully this was helpful – also, thanks so much for this resource! It’s been a huge help!
Nit An Expert..
Who is an Expert in this crazy game..?! But from what I read from your answer from above, Russia is out of the War till any aggression attack commences from Germany.
I’m glad you find axisallies.com helpful. The mobile rule book is used by many players. We will be advancing new tabs to what we think is more open and easier for players to operate. Is there anything you’d like to see?
Hope your games are going well!!
Jon
I was attacked while playing japan by the US with just 2 aircraft carrier and 4 planes and sub. I had a damaged battleship, 2 damaged aircraft carriers, destroyer and 3 scrambled aircraft to defend with. After multiple combat rolls the US was down to 2 aircraft no carriers no where to land. I had a damaged battle ship and 2 aircraft. Can the attacker keep rolling?
Yes. The rules only prevent you from moving planes somewhere where they have no possibility of safely landing, and require you to pick up planes when possible. If you plan a battle under the assumption a carrier will be undamaged and then take damage or lose the carrier, you can keep using those planes in the battle. But you will lose them afterwards, so it may be worth taking this into account when you pick casualty order.
Hi ZT205,
So question to you…If in a SZ attack and you do bring everything in ( incl AC with planes ), should you pick your air first as hits, then AC..?
Thanks for replying though,
Jon
That depends on the situation. For example, if you think the battle is going to go for a few more rounds and you will take more losses anyway, I would take damage to the carriers so that the planes can keep shooting back. But if it is the last round of the battle, then it would make more sense to take a plane as a casualty then to take carrier damage and end up losing a plane or two anyway because they can’t land.
Hi Jon,
This I have had before in my games of Global 40, and it’s one that has caused a few arguments. Logically yes, your air needs a place to land too. If no land available then you rely on your AC, either a new purchase or it gets to that SZ the battle was.
I think, if you do put your AC with planes in a battle, and you choose your AC as hits, then your planes have no where to land. You should choose your planes first, then AC I think. But really, you should not move your AC into that attacking SZ knowing it’s a low chance win.
It’s a tough one.
Jon!
do you guys have a 1940 europe second edition yet?
cause i play this with my dad, (and whoop the crap outta him) and we lost the book
Heh… We just added the Europe 1940 Second Edition PDF rules, if that’s what you’re referring to: https://axisallies.com/versions/europe-1940/
thanks you guys are amazing
If Japan attacks the Us Philippines Island before turn 3 and takes the island does the US get the 80 IPC or do they lose 5 IPC and only get 75 IPC.
Hello by the way thank you so much for your work on this incredible game. It has brought me countless hours of entertainment. I have a question for you. II have a game where there is a destroyer built in sea zone around Japan by an American IC in Korea and there is a large Japanese fleet there including transports. I know the Japanese transports cannot load from Japan in combat movement due to the presence of the destroyer. Assuming the Japan fleet stays put including the transports and wins the sea battle, can land units then load onto the transports ( but not offload) during noncombat? I
Hi Jeremy
Good question. I’m pretty sure it can’t. Transports are tricky.
A transport can’t load or offload if it participated in combat – unless it’s part of an amphibious invasion.
It can however move away from the contested seazone as part of the combat move phase. It can then pick up cargo in the other seazone and offload somewhere else as part of an invasion or even come back to the original seazone with the cargo to take part of the combat – but then it is still not allowed to offload unless it’s an amphibious assault.
Only a transport that starts the turn somewhere else can enter the seazone after the battle – in the noncombat phase – and pick up cargo.
Hi!
First, what an amazing site! We use this alot when playing or having an argument.
But we have never played with Research and Development before now. Roll a dice and hit 6 to get one. But what if you hit several 6’ers and choose chart 2 and hit the same development? Do you roll the dice again or do you loose that chance?
If you would get the same technology again, you instead roll again, and keep rolling until you get a technology you don’t already have. It’s in the official rulebook, but not in the rules as listed above.
A question about East/West Russian neutrality… The US and Japan are at war. The US is also at war with Germany and Japan. But Russia is supposedly neutral with Japan. Can the US enter the Eastern Russian territories with combat units and move up to the border with Manchukuo? It seems as though Japan would consider that a violation of their neutrality.
Also, could the UK Pacific forces transfer air units from China into Russia? As long as they’re not attacking the Japanese but only aiding the Western Russian front would this be a violation of neutrality?
Hi regarding scramble.
If I have a russian troop in a UK transport and will off load the Russian troop to a land where a Italian fighter can scramble. Will the fighter attack the Uk transporter? And if there are other surface ships in the same Sz will they be able to defend the scramble?
Hi regarding new industry,
Are the Philippines considerd as an island/group?
if yes then according to the rules you are not allowed to built a minor IC?
But is has 2 IPC value and a victory city.
Hello there,
I have a question about Air Units movement. The rules state that “Air units can move through hostile territories and sea zones as if they were friendly.” Makes sense if they are empty… but does that mean if those spaces are occupied by enemy units they can be ignored? A fighter can’t cross through a territory that has enemy ground units there can it? Or a strategic bomber cross through a sea zone defended with a carrier and two fighters?
Thanks so much for the help!